Showing posts with label dessert. Show all posts

13 October, 2015

Cheesecake Chocolate Eggs

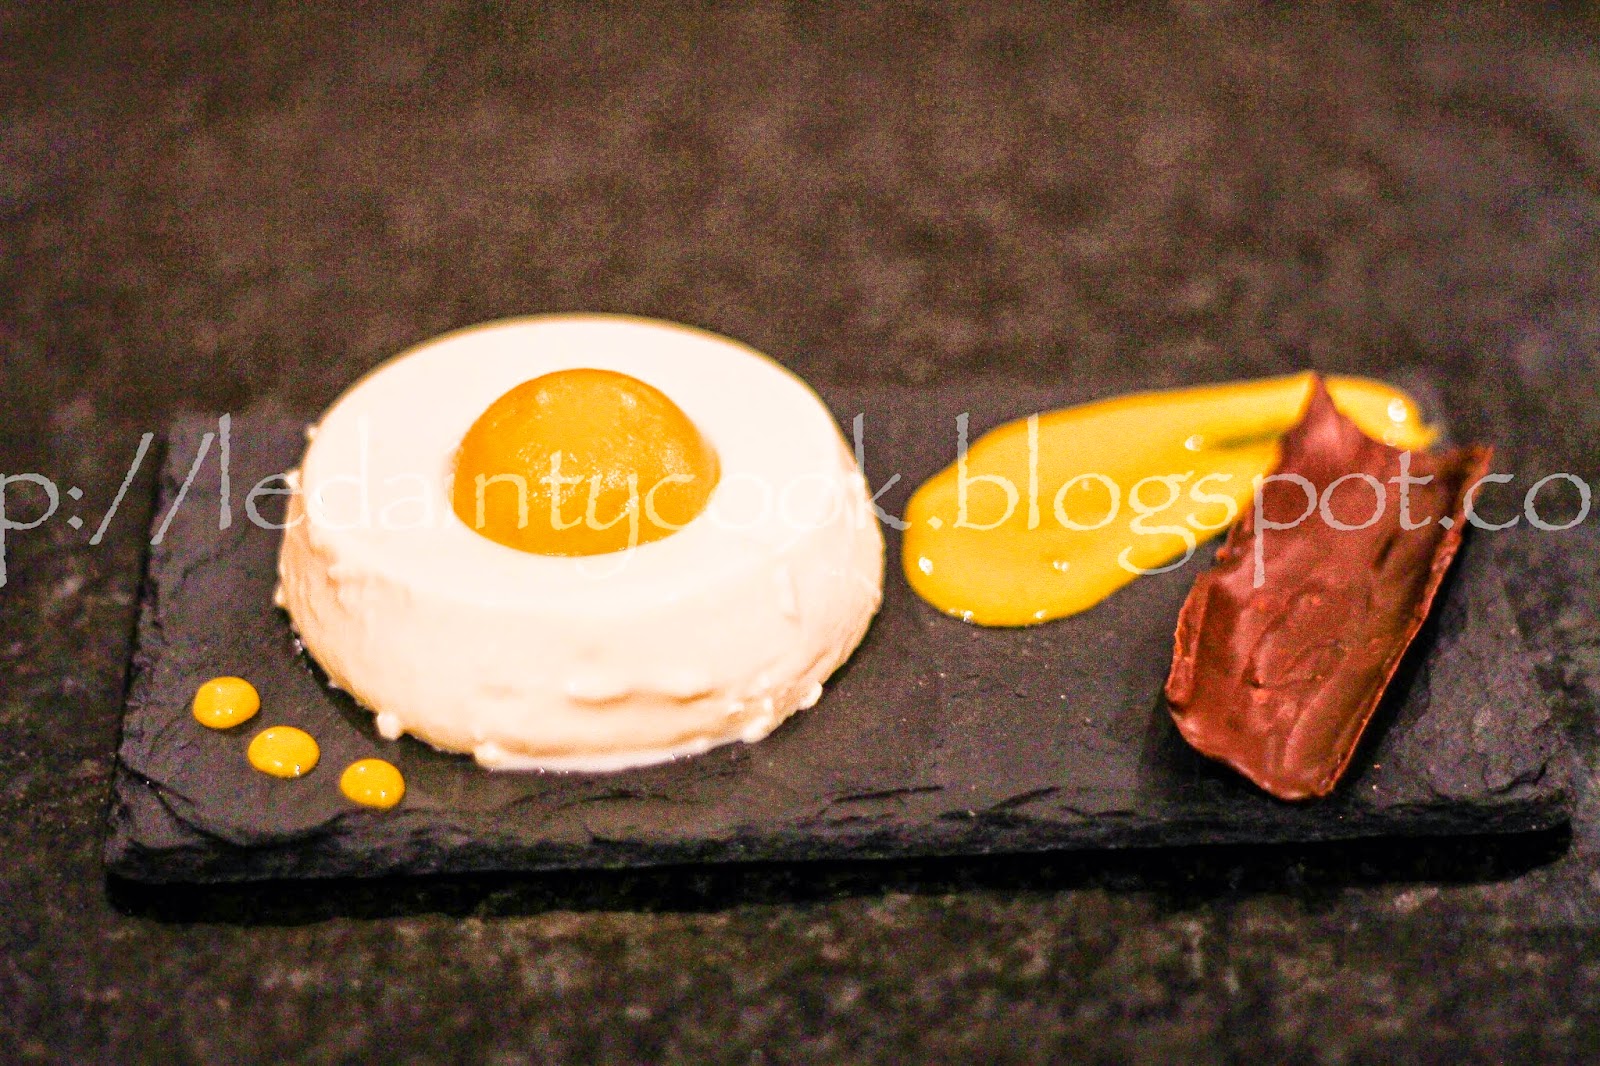
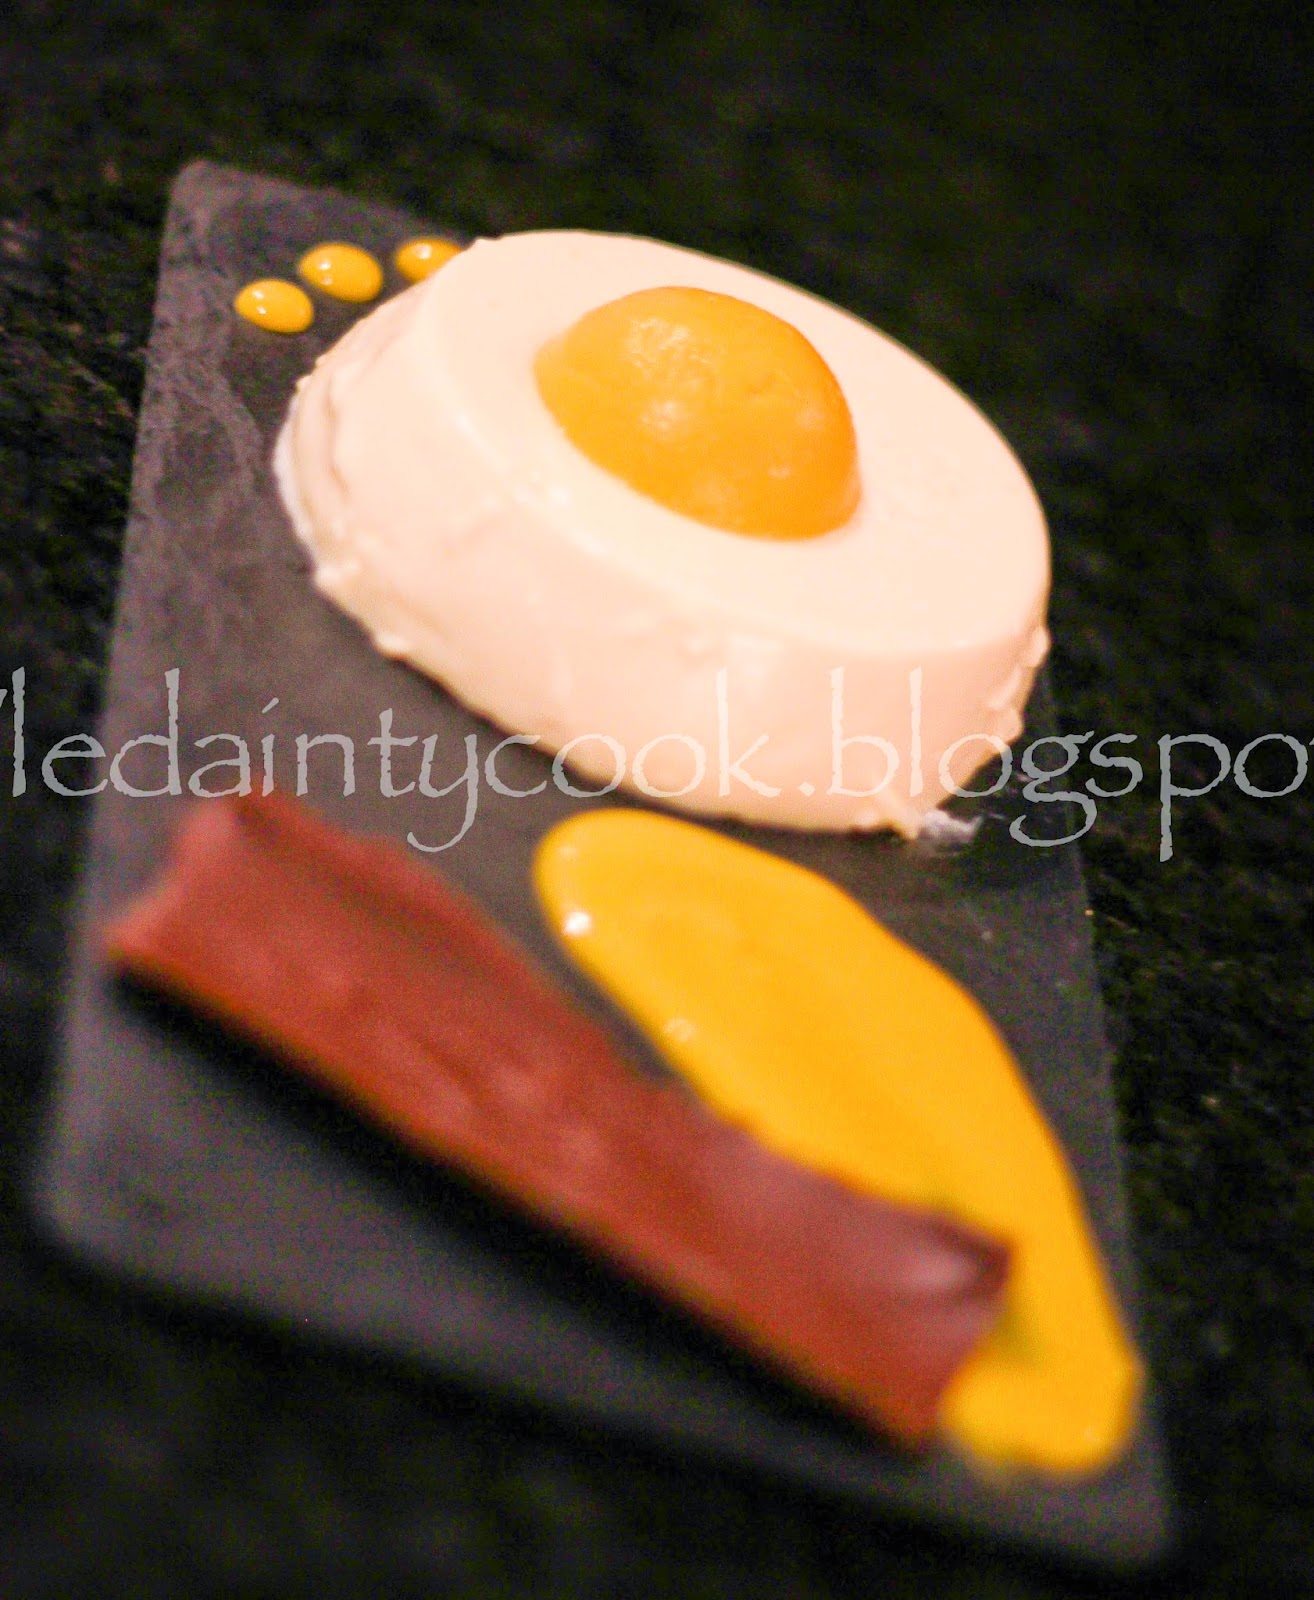
Posing as real half boiled eggs, alongside servings of sweet puff pastry soldiers, these would be an amazing treat for Easter or if you want to create something a little quirky. So simple to make and with so much of a wow factor, these must be top of your to-do list.


This Easter I wanted to do something different and a little less complicated seeing as I had final year exams to revise for. Compared to my Mango PanEggs, these were a breeze to make. I had the utmost fun constructing them and of course, they tasted just as divine as they looked - so my guests said. 

[A late post, but as they say better late than never hey!]

Ingredients:
6 Kinder eggs (or any similar sized hollow chocolate eggs)
250g marscapone
100g philadelphia
80ml double cream
2 tsp vanilla extract
100g digestive biscuits
50g caster sugar
1/2 can mango pulp (you won't use all)
1 puff pastry sheet
1 egg.

Method:

  • Heat a knife and carefully cut the tops off the eggs and place in egg moulds or an egg box.
  • Mix the marscapone, philadelphia cheese, caster sugar together.
  • In a food processor, grind the biscuits until they resemble all crumbs, not too fine. Fill the base of the eggs with these.
  • Add the vanilla and slowly add the cream and whip until soft peaks form.
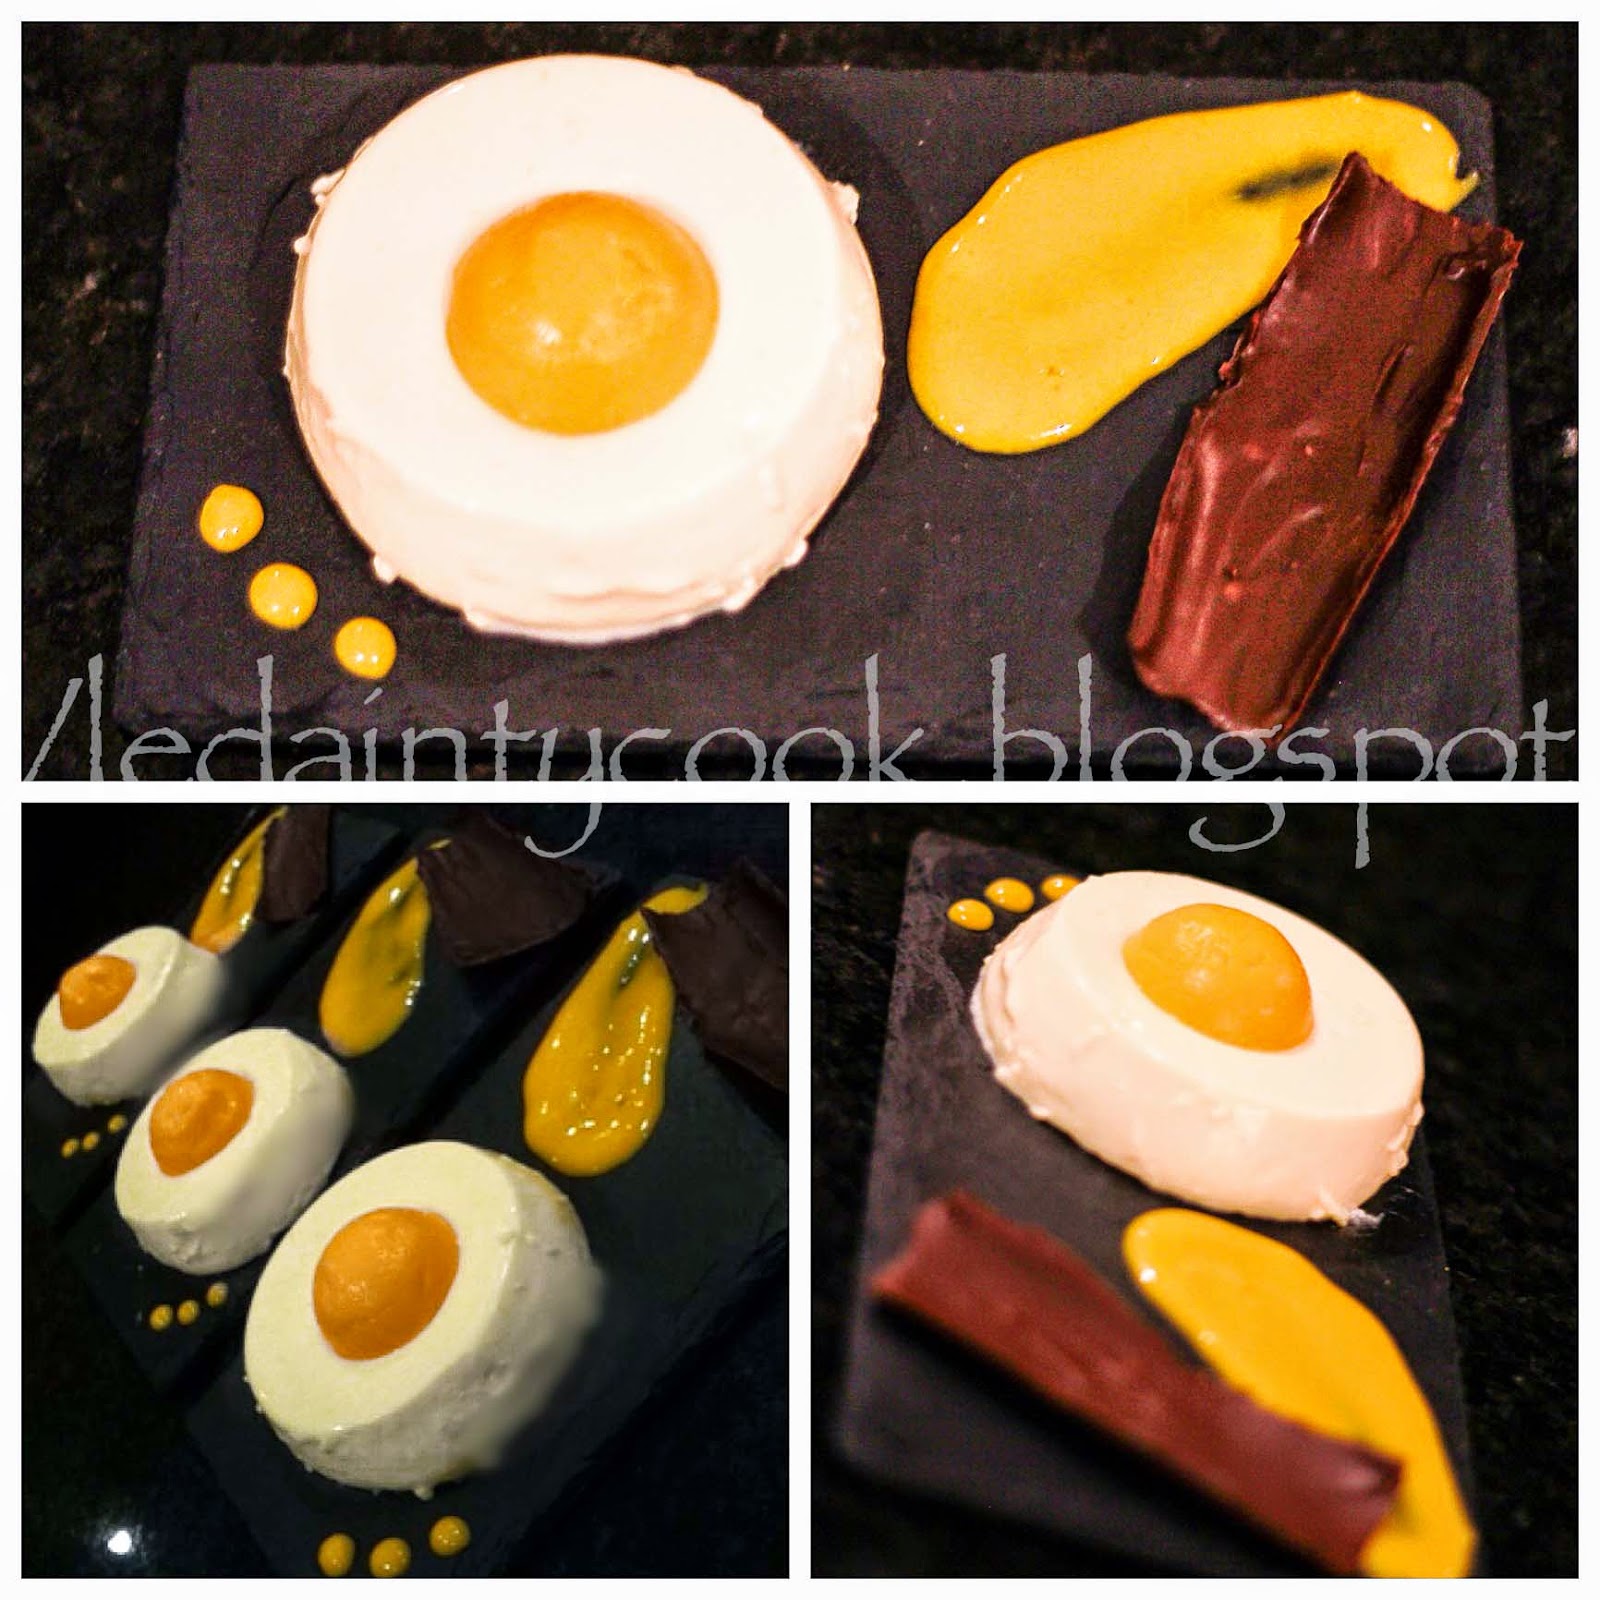
  • With a piping bag and a round nozzle, pipe the cheesecake mixture till about three quarters of the way through.
  • With the back of a teaspoon scoop out a tiny bit of the cheesecake from the middle of your eggs.
  • Fill the mini holes with mango pulp to resemble the yolk.
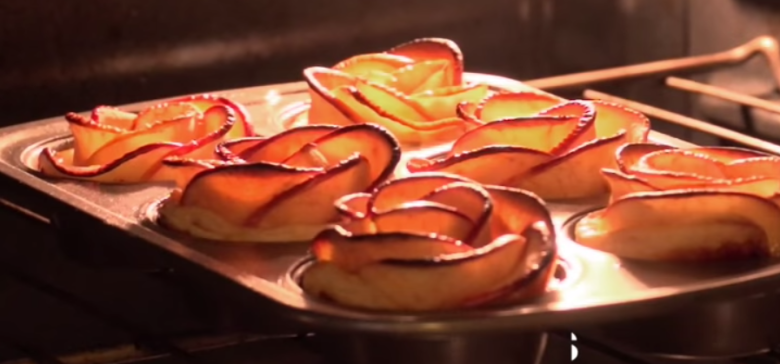
  • Cut the puff pastry sheets into thin strips to resemble soldiers and brush with a beaten egg and some caster sugar and place in the oven until risen and gold in colour.

These are really so easy and so effective to do! You don't have to make the puff pastry soldiers if you don't have that much time, but I just thought they went well with these 'half boiled eggs!'

You'd be a fool not to try these out next Easter!

Dainty Cook xox

Rose Apple and Cinnamon Puffs


An artistic take on the traditional Apple Turnover, these apple puffs, performing as red roses, will wow family members or dinner party guests and will leave your stomachs satisfied on a nippy autumn evening.


I first saw these on those baking/cooking tip videos that were circulating on social media. Usually I create quite technical or super time consuming bakes, but this looked so simple, I had to place it on the top of my to-do list. When made, they were an utter delight to eat and admire.


Ingredients:
2 large red apples (or 3 small)
1 sheet of ready to roll Puff Pastry
A handful of cinnamon
A Lemon
Apricot Jam (Strawberry or raspberry can work well too)
Red Food colouring (optional)

Method:
  • Using an apple corer, carefully remove the core of your apples. If you don't have a corer, simply remove the core once sliced (more time consuming).
  • Turn the apple to its side and slice vertically about half a 3mm thick either with a knife or slicer.
  • Cut these slices in half so you are left with two semi circles without cores.
  • Get a bowl of water and fill with warm water, adding the apples to this, then squeeze a lemon on top and mix. This is to stop them browning.
  • Microwave for 3 minutes.
  • Place the puff pastry sheet in 'portrait mode' and roll out so it is thinner and cut across small strips about 4 cms in width.
  • Get your jam and mix it with 3 tablespoons of warm water. Spoon this evenly on your strip.
  • Then, places your apple slices on the top of the strip, making sure they overlap each other by at least half and continue until you reach the end. 
  • Sprinkle over some cinnamon, roll the strip and repeat with the remaining apples.
  • If you want them more red looking, mix a drop of red food colouring with water and brush the tops and sides of the apples.
*Picture courtesy of Tip Hero
  • Place the apple roses in a cup cake or muffin tray hole, lined with cases.
  • Put them in the oven for 35-40 minutes at 180 degrees celsius. They may brown after the full cooking time but this is expected.
  • Once puffed and the apples have cooked, lightly brush with more apricot jam to sweeten.

You have now created some tasty autumnal treats that look beautiful. Serve warm and enjoy!

Heres the link to the original: http://tiphero.com/baked-apple-roses/


Dainty Cook xox


27 October, 2014

Halloween Inspired: Ghostly île Flottantes

A floating poached egg white amongst a pond of creamy vanilla crème anglaise, topped with a crunchy caramel shard - decorated as a ghost of course.


This truly is a fancy dessert and really quite simple to make, with a pinch of patience. So why don't you try this out and stun your Halloween party guests with this ghostly version? It's cute, it's tasty and definitely fits in with a scary theme.

île flottante has been one of those desserts I've been wanting to make for a long while but just hadn't got round to it. Whilst wondering what I could make for halloween without using the usual ingredients, such as pumpkin, the thought of making spooky floating islands literally just popped into my head.

But what are île flottantes I hear you ask! Well, french for floating islands (I didn't just randomly mention islands earlier for no reason incase any of you were confused) is a very well composed dessert should I say. It's usually made up of three components, each of which emit complimentary textures with every mouthful you have. It's absolutely brilliant. You get the smooth cold creaminess from the crème anglaise and then this light, almost melting, meringuey, moussey, marshmallowy even, taste along with a satisfying crunchy caramel topping that I believe is vital to finish the dish off with. 

So you think you want to have a go? Let me tell you how it was made then!


Ingredients:
Crème Anglaise:
300ml milk
80ml double cream
3 drops of vanilla bean paste/1 tsp good quality vanilla extract
70g caster sugar
4 large egg yolks

For the meringue:
4 large egg whites
100g caster sugar
4 drops lemon juice

Caramel topping:
80g caster sugar

Poaching liquid:
500ml milk
500ml water
2 tablespoons sugar

Decoration:
Googley eyes/marshamallow
Black food colouring paste

Method:

  • For the crème anglaise, add the milk, cream and vanilla paste in a saucepan and let it simmer on medium heat for 3-4 minutes, do not let it boil.
  • Meanwhile in a mixing bowl, whisk together the egg yolks and sugar until it turns pale in colour.
  • Slowly pour in about two tablespoons of the hot milk mixture and whisk away. Keep adding the milk slowly while whisking away to incorporate the eggs and to avoid it turning into a scrambled omelette!
  • Put this back on the heat and stir continuously until the mixture thickens slightly and coats the back of the spoon. Do not leave the saucepan or the creme anglaise will split if not stirred and over heated!
  • Strain the mixture into a bowl using a sieve and leave to cool, then refrigerate. 
Poaching liquid:
  • Combine the milk and water in a large pan and add the sugar until it dissolves. Make sure the liquid doesn't boil as it will ruin the outcome of the meringues.

Meringues:
  • Whisk the egg whites in a clean bowl and add 3 drops of lemon juice.
  • Gradually add the sugar a tablespoon at a time and whisk until its thick and glossy and stiff peaks form.
  • Using 2 large serving spoons, shape the egg whites in an oval shape. To add heigh and make them as 'ghosts' use a serving spoon and a spatula (or butter knife) and keep adding egg white at the top of the oval and smoothen it out with the spatula. I made mine quite big and were harder to poach because of the shape, but you can make your smaller.
  • Poach the whites for around 4-5 minutes until stiff and cooked and then turn them over for the same time. Any longer and they tend to collapse!
  • Remove them from the pan and place on some baking paper or a wire rack to drain them off.

Caramel:
  • Put the sugar in a saucepan and heat until melted and golden brown in colour. Be sure to keep an eye out so it doesn't burn.
  • Drizzle over a piece of baking paper and leave to set. 
To assemble:
  • Pour some creme anglaise into a bowl (i used spoon rests just to achieve a different look) and place the smaller flat side of the poached egg white on top. Add the googley eyes at the top - if you don't have these don't worry. Cut out two small circles from marshmallows and paint with black food colouring paste and leave to dry. Make sure they're dry or they will run onto your meringue! 
  • For the mouthes i used black food colouring paste and lighlt dabbed them onto the back of a palette knife and made a roundish mouth shape.
  • Peel off the caramel shards and add on top.


Your ghostly île flottantes are ready to be eaten now!

Any issues, feel free to drop me an email. Happy Halloween everyone :) 


Dainty Cook x


10 July, 2014

The PannEgg (Easter inspired)


A vanilla panna cotta with a mango jelly bulb, mango gel sauce and a chocolate ganache shard, or soldier in this case.
 N-to-the-ommy!


Is it an egg? Is it a spoon? (I don't know about that one, k) No, why it's panna cotta of course.

As you can see this is a slightly late post, but hey, have a go next easter, or whenever really. It can really puzzle your friends!

I'd grown slightly tired of the chocolate eggs you get everywhere. I mean, let's face it, chocolate alone, is NOT dessert. It can be part of one, certainly, but I was on my tippy toes to make a sweet dish that resembled an egg and not entirely made of chocolate.
 Thus: the Pann-Egg was laid.


See what I did there?!
Let me just tell you how I made it ...

Ingredients:

Vanilla Panna cotta:
600ml double cream
160ml full fat milk
4tsp (halal) gelatine powder
180g caster sugar
4tsp vanilla extract

Mango jelly bulb:
250ml alphonso mango purée
1&1/2tsp gelatine powder
3 tbsps double cream

Chocolate ganache shard:
75g dark chocolate
25ml double cream

Method:
For the panna cotta:
Dissolve the gelatine powder into 125ml of hot water and stir quickly.
Combine the cream, milk, vanilla extract and sugar into a saucepan and bring to the boil, then reduce the heat.
Stir in the gelatine mixture and turn off the heat.
Pour the mixture into small ramekins or moulds, leave to cool then whack 'em all the fridge so that they set. It usually takes 4 hours and more to set properly.
To serve, dip the ramekin into hot water, slide the sides out with a knife and turn upside down onto a plate.

Mango bulbs:
For these I used the lids of the cake pop moulds to form the bulb.
Dissolve 1 - 1&1/2 tsps of gelatine powder into 60ml of hot water.
Mix the gelatine and puree together and then take out some tablespoons of the puree and set aside.
With the remaining mixture, add roughly 3 tablespoons of double cream and stir. Pour this into the cake pop moulds and refrigerate!
Onnce set (it will still be wobbly/soft so you need to use a spoon to scoop the bulbs out) plonk them on top of the panna cotta to form an egg!

Chocolate soldiers:
Cut out rectangles (7x3cm) of greaseproof paper.
Melt the chocolate, add in the cream and stir.
Paint the greaseproof paper with the ganache and leave to set in the fridge until firm. Once they're done all you do is peel them off carefully.


To serve, place it on plate with the panna cotta, use the remaining puree that was set a side as the sauce and ba boom. You've got you're a nice plate of a PanEgg.


It's amazing. No yolk ;)


Dainty Cook x


01 July, 2014

Mushroom 'Mould' Cake.


A dense dark chocolate truffle cake, filled with chocolate cream and ruby-red raspberries, you would have to be a right fool to not eat this peculiar beauty. 


Yes, you read that correctly. I have indeed posted a recipe stating how to make a 'mouldy' mushroom CAKE. This cake has definitely gone off the radar (ha, see what I did there - gone off - did you get it? You got it right?!) for simultaneously pertaining to be 'disgusting', indulgent and über cool. It takes vintage to it's literal meaning.

For me, this was a spontaneous sculpture that I was itching to do. If any of you know me, I have many cravings each hour/day/week. A friend of mine uttered the phrase 'chocolate cake' and there it was, BAM, fixed in my mind, transforming me into a beast until I appeased my appetite. So, I popped down to my local Sainsbury's, bought the ingredients and was ready to bake.

But there was una problema..

I did NOT want to bake a standard chocolate cake. Incase you've guessed already, I'm a huge fan of raspberries and chocolate. When they both marry together, they produce offspring in your mouth, bursting out full of this awesome indescribable flavour. So gooood. Anyway, weird and slightly poor analogy aside; I was as per, grown tedious of making the same old chocolate buttercream cake, topped with berries, coated with cigarellos - yawn - boringgg.

And then, I was truly inspired. I witnessed a photo: a page from Lily Vanilli's book which had meringue shaped mushrooms. *Light bulb moment*


Next thing I know, this ensemble was assembled.


Ingredients:

200g softened butter
200g caster sugar
200g self-raising flour
50g cocoa powder
4 medium eggs
Pinch of salt
Milk to loosen (optional)

Method:

  • Preheat the oven to 180 degrees C.
  • Combine the butter and sugar until pale and fluffy, usually this takes 5-7 mins. 
  • Add the eggs one at a time until well-combined.
  • Sift in the flour cocoa powder and add the salt.
  • Beat together until it forms a smoooooth mixture.
  • Dash in a tablespoon or two of milk if the mixture is super thick.
  • Dollop the mix in either two 8 inch sandwich pans or an 8 inch cake tin and bake for around 30 minutes.
  • Once baked let it cool on a wire wrack and place on a 12 inch cake board, ready to be filled and glazed.

The Filling:

150g dark chocolate (chopped)
25g unsalted butter
250ml double cream
Pinch of salt 
300g Raspberries

  • Place the butter and chocolate in a bowl.
  • Heat the cream until hot and pour into the chocolate, stirring it together until it melts and is well combined.
  • Once cooled, fill the top of one layer with this and top evenly with fresh raspberries, placing the other layer on top.

The Truffle Glaze:

250g dark chocolate
15g unsalted butter
200ml double cream
Cocoa powder to dust

  • Follow the same steps as with the filling.
  • Spoon the glaze over the whole cake and let it set - but not completely.
  • Dust the whole cake with cocoa powder so that it looks like soil.
  • Decorate with the meringue mushrooms, by sticking them into the cake and also around: make it look like its going off and growing mushroom mould! You can even break pieces off of the cake so that they look like rocks.

The Meringue Mushrooms:

5 egg whites
1 tsp lemon juice
Pinch of salt
230g caster sugar
30g cocoa powder
100g chocolate

  • Add lemon juice and salt to the get whites and whip until soft peaks are formed. Beat in the sugar slowly, a few tablespoons at a time, continuing until they get all stiff. Half the egg white mix, spooning the other half into another bowl. Fold in two-thirds of the cocoa powder in one half and the remaining in the other.
  • Fill a piping bag with the beaten egg whites and using a round top, pipe mushroom stems - making sure they are long and wide enough to be stable.
  • Pipe the same number of domes - these will be the tops of the shroomies!
  • Bake them for about an hour and leave them in the oven so that they dry - another hour or so for this I'd say.
  • To attach the tops to the stems, melt the chocolate and use this to stick the two together. The stems may need a bitta slicing so that they're flat and can stand upright.


And voila, the mushroom meringues are done! They're actually super tasty, so try not to eat them all before you decorate, particularly if you love real mushrooms and sweet stuff like me! I then added some edible flowers (and maybe some non edible leaves) to give it that extra gardeny feel. 


Pretty nifty eh? 


Dainty Cook x


28 June, 2014

Peanutella Chip Cookies

Chocolate chip cookies made with crunchy peanut butter and somewhat subtle dollops of Nutella, which ultimately ballet on your tongue. 
They're THAT good.


I cannot tell you how much I adore peanut butter. I used to not like it once upon a time. In fact, I despised the very thing. Then came a time where anything found in a jar and could be consumed by a spoon was a huge hit as I started university. Spoonfuls of peanut butter whilst studying for my first year exams had become a ritual. That and having a packet of chocolate fingers to dip in a jar full. This is how we students do les examens!

Anyway, it's a known fact that peanut butter goes a bit too well with chocolate. I mean, forget yer peanut butter and jelly sandwiches, s'all about pb and Nutella!

And when I realised I could put the two together in my absolute fave biscuit - the cookie - I felt like a kitchen goddess. *Halo appears*

Here's how they were put together:


Ingredients:
225g unsalted butter (softish)
200g caster sugar (you can play around if you want it less sweet)
200g soft light brown sugar
2 eggs
1/2 tsp vanilla extract
240g crunchy peanut butter
40g nutella
340g plain flour
2 1/2 tsp bicarbonate of soda
1/2 tsp salt
85g dark chocolate chips (or chopped)

Method:
  • Preheat oven to 170C, Gas 3. Fan assisted ovens lower the temp by 10-20C and prepare baking trays with greaseproof/baking paper.
  • Using an electric mixer with the paddle or a handheld electric whisk, mix the butter and sugars together until they transform into a wonderful light and fluffy mixture.
  • One at a time, crack in the eggs and mix well. Be sure to scrape any unmixed ingredients from the side of the bowl!
  • Turn the mixer down to a slow speed and beat in the vanilla and peanut butter.
  • Gradually add the flour, bicarbonate of soda and salt and mix well until a smooth dough is formed. Then add the Nutella - this is actually optional and I only add a little to give it a subtle taste.
  • Sprinkle in the chocolate chips - I aways find this the best bit, I don't know why!
  • Scoop out equal amounts of the cookie dough on each tray using a tablespoon spoon or scooper. Make sure they're spread apart as they expand while baking.
  • Bake for roughly 10 minutes, or until they're golden brown around the edges and quite flat. They will be super soft in the middle but that's what you want. They tend to harden later anyway.
  • Cool  the cookies slightly on the trays before turning out onto a wire cooling rack to cool completely. The cookies should be nicely soft and chewy and a teeny crunchy on the outside. Mmmmm.

Seriously these literally melt in your mouth when you eat them fresh. I was so pleased with these, I genuinely wanted to marry myself. Yup. I mean being able to bake super soft mouth melting cookies!?! You need magical hands. Oh and maybe this recipe….


So have a go and let me know how it turns out! :)


Dainty cook x

25 June, 2014

Crème-to-the-Brûlée

Vanilla crème brûlée, with strawberry, white chocolate spoons and a smooth salted caramel disc - topped with crunchy honeycomb pieces. 

Mouth watering yet?


I can't deny that this is one of my ultimate fave desserts. The baked creamy goodness that instantly melts on your tongue, exposing its vanilla flavour as it begins to tango with your tastebuds. Oh but the best part, the fun part, cracking the burnt crunchy sugar with your spoon as you begin to dig in. The smooth and the crisp become an unbeatable fusion of textures.

And it's no wonder it's sort of named after these textures - crème brûlée - 'burnt cream' in French, is the most delicious yet simple of desserts to make and here's how I made it:

Ingredients:

For the vanilla crème brûlée:
440ml double cream
100ml full fat milk
55g caster sugar
1 vanilla pod/3tsp good quality vanilla extract
5 egg yolks

White Chocolate spoons:
200g white chocolate chips

(Smooth) Salted Caramel Disc:
80g salted butter
75g soft light brown sugar
75g caster sugar
120ml cream
1/2tsp sea salt
Honeycomb pieces (bought)

Method:
  • Combine the double cream, milk and vanilla extract (or a slit vanilla pod) into a saucepan and leave to the side.
  • Separate the yolks from the whites and place in a mixing bowl, adding the caster sugar. The separating is probably the only tricky part to this - well I find it a pain to be honest! Then whisk the yolks and sugar together until pale and slightly fluffy.
  • Bring the saucepan onto the heat until the sides begin to bubble a bit.
  • Gradually with a hand whisk, stir in the hot cream mix into the egg. You'll see it will foam up once done, try get rid of all the foam with a large spoon.
  • Pour into ramekins, jars or a big dish and place these in a ban marie filled with boiled water about 1.5-2cm high and pop it into the oven for 30-35 minutes.
  • You want the crème brûlée to be slightly wobbly in the middle and not completely set. Place these in the fridge and scatter teaspoon of caster sugar on the top surface and then blowtorch until its burnt! Do this closer to the serving time and pop 'em back in the fridge.
And that's pretty much it! For the additional extras and decoration:
To make the chocolate spoon:

  • Melt white chocolate in a bowl over simmering water (water bath) until runny and fill up the spoon moulds, placing them in the fridge.
The smooth salted caramel disc:
  • Melt the butter and sugars in a saucepan for 3 minutes or until dissolved, swirling it from time to time.
  • Add the cream and sea salt and swirl again - get those hips shaking! I mean, use a wooden spoon to stir the sugar mixture…
  • Once amalgamated, taste to check if there's enough salt and then pour into a jug to set!
This makes quite a bit, so you can store it up to a week to use for other nommy desserts. Or you know just to eat with a spoon instead of yer good ol' Ben and Jerry's!

Make a circle onto a serving plate, (I used a cookie cutter) and top with honeycomb pieces. Okay so, I had recently bought some ready made ones from Lakeland and used these, but if you want the homemade recipe check out my Get Loose: Chocolate and Honeycomb Mousse recipe!


That's about it! I added chocolate dots around each component to finish off, as well as a strawberry in each jar, as this creamy concotion goes well with berries and maybe there were some growing in my garden…


Cute little desserts, don't you think?


Dainty Cook x