Showing posts with label Recipes. Show all posts

13 October, 2015

Cheesecake Chocolate Eggs

Posing as real half boiled eggs, alongside servings of sweet puff pastry soldiers, these would be an amazing treat for Easter or if you want to create something a little quirky. So simple to make and with so much of a wow factor, these must be top of your to-do list.


This Easter I wanted to do something different and a little less complicated seeing as I had final year exams to revise for. Compared to my Mango PanEggs, these were a breeze to make. I had the utmost fun constructing them and of course, they tasted just as divine as they looked - so my guests said. 

[A late post, but as they say better late than never hey!]

Ingredients:
6 Kinder eggs (or any similar sized hollow chocolate eggs)
250g marscapone
100g philadelphia
80ml double cream
2 tsp vanilla extract
100g digestive biscuits
50g caster sugar
1/2 can mango pulp (you won't use all)
1 puff pastry sheet
1 egg.

Method:

  • Heat a knife and carefully cut the tops off the eggs and place in egg moulds or an egg box.
  • Mix the marscapone, philadelphia cheese, caster sugar together.
  • In a food processor, grind the biscuits until they resemble all crumbs, not too fine. Fill the base of the eggs with these.
  • Add the vanilla and slowly add the cream and whip until soft peaks form.
  • With a piping bag and a round nozzle, pipe the cheesecake mixture till about three quarters of the way through.
  • With the back of a teaspoon scoop out a tiny bit of the cheesecake from the middle of your eggs.
  • Fill the mini holes with mango pulp to resemble the yolk.
  • Cut the puff pastry sheets into thin strips to resemble soldiers and brush with a beaten egg and some caster sugar and place in the oven until risen and gold in colour.

These are really so easy and so effective to do! You don't have to make the puff pastry soldiers if you don't have that much time, but I just thought they went well with these 'half boiled eggs!'

You'd be a fool not to try these out next Easter!

Dainty Cook xox

Rose Apple and Cinnamon Puffs


An artistic take on the traditional Apple Turnover, these apple puffs, performing as red roses, will wow family members or dinner party guests and will leave your stomachs satisfied on a nippy autumn evening.


I first saw these on those baking/cooking tip videos that were circulating on social media. Usually I create quite technical or super time consuming bakes, but this looked so simple, I had to place it on the top of my to-do list. When made, they were an utter delight to eat and admire.


Ingredients:
2 large red apples (or 3 small)
1 sheet of ready to roll Puff Pastry
A handful of cinnamon
A Lemon
Apricot Jam (Strawberry or raspberry can work well too)
Red Food colouring (optional)

Method:
  • Using an apple corer, carefully remove the core of your apples. If you don't have a corer, simply remove the core once sliced (more time consuming).
  • Turn the apple to its side and slice vertically about half a 3mm thick either with a knife or slicer.
  • Cut these slices in half so you are left with two semi circles without cores.
  • Get a bowl of water and fill with warm water, adding the apples to this, then squeeze a lemon on top and mix. This is to stop them browning.
  • Microwave for 3 minutes.
  • Place the puff pastry sheet in 'portrait mode' and roll out so it is thinner and cut across small strips about 4 cms in width.
  • Get your jam and mix it with 3 tablespoons of warm water. Spoon this evenly on your strip.
  • Then, places your apple slices on the top of the strip, making sure they overlap each other by at least half and continue until you reach the end. 
  • Sprinkle over some cinnamon, roll the strip and repeat with the remaining apples.
  • If you want them more red looking, mix a drop of red food colouring with water and brush the tops and sides of the apples.
*Picture courtesy of Tip Hero
  • Place the apple roses in a cup cake or muffin tray hole, lined with cases.
  • Put them in the oven for 35-40 minutes at 180 degrees celsius. They may brown after the full cooking time but this is expected.
  • Once puffed and the apples have cooked, lightly brush with more apricot jam to sweeten.

You have now created some tasty autumnal treats that look beautiful. Serve warm and enjoy!

Heres the link to the original: http://tiphero.com/baked-apple-roses/


Dainty Cook xox


10 July, 2014

The PannEgg (Easter inspired)


A vanilla panna cotta with a mango jelly bulb, mango gel sauce and a chocolate ganache shard, or soldier in this case.
 N-to-the-ommy!


Is it an egg? Is it a spoon? (I don't know about that one, k) No, why it's panna cotta of course.

As you can see this is a slightly late post, but hey, have a go next easter, or whenever really. It can really puzzle your friends!

I'd grown slightly tired of the chocolate eggs you get everywhere. I mean, let's face it, chocolate alone, is NOT dessert. It can be part of one, certainly, but I was on my tippy toes to make a sweet dish that resembled an egg and not entirely made of chocolate.
 Thus: the Pann-Egg was laid.


See what I did there?!
Let me just tell you how I made it ...

Ingredients:

Vanilla Panna cotta:
600ml double cream
160ml full fat milk
4tsp (halal) gelatine powder
180g caster sugar
4tsp vanilla extract

Mango jelly bulb:
250ml alphonso mango purée
1&1/2tsp gelatine powder
3 tbsps double cream

Chocolate ganache shard:
75g dark chocolate
25ml double cream

Method:
For the panna cotta:
Dissolve the gelatine powder into 125ml of hot water and stir quickly.
Combine the cream, milk, vanilla extract and sugar into a saucepan and bring to the boil, then reduce the heat.
Stir in the gelatine mixture and turn off the heat.
Pour the mixture into small ramekins or moulds, leave to cool then whack 'em all the fridge so that they set. It usually takes 4 hours and more to set properly.
To serve, dip the ramekin into hot water, slide the sides out with a knife and turn upside down onto a plate.

Mango bulbs:
For these I used the lids of the cake pop moulds to form the bulb.
Dissolve 1 - 1&1/2 tsps of gelatine powder into 60ml of hot water.
Mix the gelatine and puree together and then take out some tablespoons of the puree and set aside.
With the remaining mixture, add roughly 3 tablespoons of double cream and stir. Pour this into the cake pop moulds and refrigerate!
Onnce set (it will still be wobbly/soft so you need to use a spoon to scoop the bulbs out) plonk them on top of the panna cotta to form an egg!

Chocolate soldiers:
Cut out rectangles (7x3cm) of greaseproof paper.
Melt the chocolate, add in the cream and stir.
Paint the greaseproof paper with the ganache and leave to set in the fridge until firm. Once they're done all you do is peel them off carefully.


To serve, place it on plate with the panna cotta, use the remaining puree that was set a side as the sauce and ba boom. You've got you're a nice plate of a PanEgg.


It's amazing. No yolk ;)


Dainty Cook x


01 July, 2014

Mushroom 'Mould' Cake.


A dense dark chocolate truffle cake, filled with chocolate cream and ruby-red raspberries, you would have to be a right fool to not eat this peculiar beauty. 


Yes, you read that correctly. I have indeed posted a recipe stating how to make a 'mouldy' mushroom CAKE. This cake has definitely gone off the radar (ha, see what I did there - gone off - did you get it? You got it right?!) for simultaneously pertaining to be 'disgusting', indulgent and über cool. It takes vintage to it's literal meaning.

For me, this was a spontaneous sculpture that I was itching to do. If any of you know me, I have many cravings each hour/day/week. A friend of mine uttered the phrase 'chocolate cake' and there it was, BAM, fixed in my mind, transforming me into a beast until I appeased my appetite. So, I popped down to my local Sainsbury's, bought the ingredients and was ready to bake.

But there was una problema..

I did NOT want to bake a standard chocolate cake. Incase you've guessed already, I'm a huge fan of raspberries and chocolate. When they both marry together, they produce offspring in your mouth, bursting out full of this awesome indescribable flavour. So gooood. Anyway, weird and slightly poor analogy aside; I was as per, grown tedious of making the same old chocolate buttercream cake, topped with berries, coated with cigarellos - yawn - boringgg.

And then, I was truly inspired. I witnessed a photo: a page from Lily Vanilli's book which had meringue shaped mushrooms. *Light bulb moment*


Next thing I know, this ensemble was assembled.


Ingredients:

200g softened butter
200g caster sugar
200g self-raising flour
50g cocoa powder
4 medium eggs
Pinch of salt
Milk to loosen (optional)

Method:

  • Preheat the oven to 180 degrees C.
  • Combine the butter and sugar until pale and fluffy, usually this takes 5-7 mins. 
  • Add the eggs one at a time until well-combined.
  • Sift in the flour cocoa powder and add the salt.
  • Beat together until it forms a smoooooth mixture.
  • Dash in a tablespoon or two of milk if the mixture is super thick.
  • Dollop the mix in either two 8 inch sandwich pans or an 8 inch cake tin and bake for around 30 minutes.
  • Once baked let it cool on a wire wrack and place on a 12 inch cake board, ready to be filled and glazed.

The Filling:

150g dark chocolate (chopped)
25g unsalted butter
250ml double cream
Pinch of salt 
300g Raspberries

  • Place the butter and chocolate in a bowl.
  • Heat the cream until hot and pour into the chocolate, stirring it together until it melts and is well combined.
  • Once cooled, fill the top of one layer with this and top evenly with fresh raspberries, placing the other layer on top.

The Truffle Glaze:

250g dark chocolate
15g unsalted butter
200ml double cream
Cocoa powder to dust

  • Follow the same steps as with the filling.
  • Spoon the glaze over the whole cake and let it set - but not completely.
  • Dust the whole cake with cocoa powder so that it looks like soil.
  • Decorate with the meringue mushrooms, by sticking them into the cake and also around: make it look like its going off and growing mushroom mould! You can even break pieces off of the cake so that they look like rocks.

The Meringue Mushrooms:

5 egg whites
1 tsp lemon juice
Pinch of salt
230g caster sugar
30g cocoa powder
100g chocolate

  • Add lemon juice and salt to the get whites and whip until soft peaks are formed. Beat in the sugar slowly, a few tablespoons at a time, continuing until they get all stiff. Half the egg white mix, spooning the other half into another bowl. Fold in two-thirds of the cocoa powder in one half and the remaining in the other.
  • Fill a piping bag with the beaten egg whites and using a round top, pipe mushroom stems - making sure they are long and wide enough to be stable.
  • Pipe the same number of domes - these will be the tops of the shroomies!
  • Bake them for about an hour and leave them in the oven so that they dry - another hour or so for this I'd say.
  • To attach the tops to the stems, melt the chocolate and use this to stick the two together. The stems may need a bitta slicing so that they're flat and can stand upright.


And voila, the mushroom meringues are done! They're actually super tasty, so try not to eat them all before you decorate, particularly if you love real mushrooms and sweet stuff like me! I then added some edible flowers (and maybe some non edible leaves) to give it that extra gardeny feel. 


Pretty nifty eh? 


Dainty Cook x


28 June, 2014

Peanutella Chip Cookies

Chocolate chip cookies made with crunchy peanut butter and somewhat subtle dollops of Nutella, which ultimately ballet on your tongue. 
They're THAT good.


I cannot tell you how much I adore peanut butter. I used to not like it once upon a time. In fact, I despised the very thing. Then came a time where anything found in a jar and could be consumed by a spoon was a huge hit as I started university. Spoonfuls of peanut butter whilst studying for my first year exams had become a ritual. That and having a packet of chocolate fingers to dip in a jar full. This is how we students do les examens!

Anyway, it's a known fact that peanut butter goes a bit too well with chocolate. I mean, forget yer peanut butter and jelly sandwiches, s'all about pb and Nutella!

And when I realised I could put the two together in my absolute fave biscuit - the cookie - I felt like a kitchen goddess. *Halo appears*

Here's how they were put together:


Ingredients:
225g unsalted butter (softish)
200g caster sugar (you can play around if you want it less sweet)
200g soft light brown sugar
2 eggs
1/2 tsp vanilla extract
240g crunchy peanut butter
40g nutella
340g plain flour
2 1/2 tsp bicarbonate of soda
1/2 tsp salt
85g dark chocolate chips (or chopped)

Method:
  • Preheat oven to 170C, Gas 3. Fan assisted ovens lower the temp by 10-20C and prepare baking trays with greaseproof/baking paper.
  • Using an electric mixer with the paddle or a handheld electric whisk, mix the butter and sugars together until they transform into a wonderful light and fluffy mixture.
  • One at a time, crack in the eggs and mix well. Be sure to scrape any unmixed ingredients from the side of the bowl!
  • Turn the mixer down to a slow speed and beat in the vanilla and peanut butter.
  • Gradually add the flour, bicarbonate of soda and salt and mix well until a smooth dough is formed. Then add the Nutella - this is actually optional and I only add a little to give it a subtle taste.
  • Sprinkle in the chocolate chips - I aways find this the best bit, I don't know why!
  • Scoop out equal amounts of the cookie dough on each tray using a tablespoon spoon or scooper. Make sure they're spread apart as they expand while baking.
  • Bake for roughly 10 minutes, or until they're golden brown around the edges and quite flat. They will be super soft in the middle but that's what you want. They tend to harden later anyway.
  • Cool  the cookies slightly on the trays before turning out onto a wire cooling rack to cool completely. The cookies should be nicely soft and chewy and a teeny crunchy on the outside. Mmmmm.

Seriously these literally melt in your mouth when you eat them fresh. I was so pleased with these, I genuinely wanted to marry myself. Yup. I mean being able to bake super soft mouth melting cookies!?! You need magical hands. Oh and maybe this recipe….


So have a go and let me know how it turns out! :)


Dainty cook x

25 June, 2014

Crème-to-the-Brûlée

Vanilla crème brûlée, with strawberry, white chocolate spoons and a smooth salted caramel disc - topped with crunchy honeycomb pieces. 

Mouth watering yet?


I can't deny that this is one of my ultimate fave desserts. The baked creamy goodness that instantly melts on your tongue, exposing its vanilla flavour as it begins to tango with your tastebuds. Oh but the best part, the fun part, cracking the burnt crunchy sugar with your spoon as you begin to dig in. The smooth and the crisp become an unbeatable fusion of textures.

And it's no wonder it's sort of named after these textures - crème brûlée - 'burnt cream' in French, is the most delicious yet simple of desserts to make and here's how I made it:

Ingredients:

For the vanilla crème brûlée:
440ml double cream
100ml full fat milk
55g caster sugar
1 vanilla pod/3tsp good quality vanilla extract
5 egg yolks

White Chocolate spoons:
200g white chocolate chips

(Smooth) Salted Caramel Disc:
80g salted butter
75g soft light brown sugar
75g caster sugar
120ml cream
1/2tsp sea salt
Honeycomb pieces (bought)

Method:
  • Combine the double cream, milk and vanilla extract (or a slit vanilla pod) into a saucepan and leave to the side.
  • Separate the yolks from the whites and place in a mixing bowl, adding the caster sugar. The separating is probably the only tricky part to this - well I find it a pain to be honest! Then whisk the yolks and sugar together until pale and slightly fluffy.
  • Bring the saucepan onto the heat until the sides begin to bubble a bit.
  • Gradually with a hand whisk, stir in the hot cream mix into the egg. You'll see it will foam up once done, try get rid of all the foam with a large spoon.
  • Pour into ramekins, jars or a big dish and place these in a ban marie filled with boiled water about 1.5-2cm high and pop it into the oven for 30-35 minutes.
  • You want the crème brûlée to be slightly wobbly in the middle and not completely set. Place these in the fridge and scatter teaspoon of caster sugar on the top surface and then blowtorch until its burnt! Do this closer to the serving time and pop 'em back in the fridge.
And that's pretty much it! For the additional extras and decoration:
To make the chocolate spoon:

  • Melt white chocolate in a bowl over simmering water (water bath) until runny and fill up the spoon moulds, placing them in the fridge.
The smooth salted caramel disc:
  • Melt the butter and sugars in a saucepan for 3 minutes or until dissolved, swirling it from time to time.
  • Add the cream and sea salt and swirl again - get those hips shaking! I mean, use a wooden spoon to stir the sugar mixture…
  • Once amalgamated, taste to check if there's enough salt and then pour into a jug to set!
This makes quite a bit, so you can store it up to a week to use for other nommy desserts. Or you know just to eat with a spoon instead of yer good ol' Ben and Jerry's!

Make a circle onto a serving plate, (I used a cookie cutter) and top with honeycomb pieces. Okay so, I had recently bought some ready made ones from Lakeland and used these, but if you want the homemade recipe check out my Get Loose: Chocolate and Honeycomb Mousse recipe!


That's about it! I added chocolate dots around each component to finish off, as well as a strawberry in each jar, as this creamy concotion goes well with berries and maybe there were some growing in my garden…


Cute little desserts, don't you think?


Dainty Cook x

01 November, 2013

'Jannat' in a Jar: AKA Nutella.

In Arabic, 'Jannat' means heaven. And to me, that's exactly what Nutella is. Well any hazelnut spread really, but nothing beats good ol' Nutella. I just can't express my love for this chocolatey goodness. On hot toast in the mornings or as a midnight snack, with breadsticks, chappatis even. Anything! The best is, and I'm not ashamed to admit it, getting your fingers dirty and licking them off straight from the jar. It turns all of us into big kids.

When hazelnut meets chocolate, awesome chemistry is made. And at times I've wanted to sandwich macarons or other goodies with Nutella. But sometimes, the shop bought jar doesn't quite fit in with the homemade baked delights.

Recently, I ran out (shock horror) and thought I'd make my own. I read that it tastes better. I mean what could possibly be better than Nutella!? So I thought I'd finally give it a go.


Here's how I made it:

Ingredients: 
230g hazelnuts
1/3 cup cocoa powder
1 and 1/4 cup icing sugar 
1 teaspoon vanilla extract
3 tablespoons any flavourless oil, hazelnut oil works better, if available.
1/4 teaspoon salt

HOW TO MAKE THIS GOD GIVEN GIFT:

• Get your hazelnuts and put it in a baking tray in the middle shelf of an oven to roast for around 15 minutes. Or until you get a hazelnutty aroma wafting in the kitchen, but then that could also signal that they're burnt so....errr just keep an eye on 'em.


•If they're blanched you've saved yourself a lot of time. It also shows you have common sense to buy blanched nuts so you don't have to take the skin off later. But if you're non-sensical, like myself, (is that even a word?!) then once roasted, place them in a bowl with another bowl the same size on top and shake, shake, shake them, 'till they're practically naked.

•Grind them in a food processor until it turns into a thick paste like consistency, make sure to get all the oil out of them.


•Dollop in your icing sugar, oil, vanilla extract and salt and blend away. 

•Now it could still be really thick, in that case add a bit more oil, if it's too smooth then you could add more icing sugar, or grind it for longer, some of us prefer it that way however. I know I do if I'm also gonna use it to fill stuff.


And voila, you have your own Nutella and though it's not quite the same, it tastes 100x more flavoursome then the real thing! Like heavennn *sings* And it couldn't be easier!

Kinda just added my own label, because I'm cool like that.

Also, I just discovered that Nutella is actually pronounced as 'Noo-tella'. I think I fell more into a fit of hysterics, rather than disappointment as I found this out. Seriously?! NOO-tella. With my pea-NOOT butter sandwich?! Ha! No. Just no.

Try not to sleep with the jar of this amazing stuff. Because that's weird. Not that I do that or anything...


The Dainty Cook x


30 July, 2013

Temperamental Twats: The Macaron.

Yes, this is yet another post about macarons. If you haven't noticed (minus my last two recipes) I hadn't blogged in a while. Why not? Well whilst I did do some making and baking, which I quite frankly, was too lazy to type up, I was busy perfecting my 'macaronage'. Or trying to anyway.


As I mentioned in my post 'Macaron Madness', these have become as popular as the teenage obsession with Zayn Malik's hair. (I'm not going to lie, I think he is gorgeous!) They're like a little French delicacy I guess. Existing in a variety of flavours, fillings and colours, there's just something about them that I cannot get enough of. 

I am obsessed.

They're pricey and they're scarce where I live, so I thought I'd rise up to the challenge and make them myself.

Now let me tell you this straight mate. Unless you have magic hands or an enormous stroke of good luck and chance by your side, you will NOT get these right the first time. Like the title of this suggests, these idiots are far too temperamental. Do mind my language, I only use such terms when I'm annoyed. And oh boyyy have these buggers frustrated the hell out of me!

So in my recent trials, I've had around one fail. One okay. One awesome-oh-my-god-I-am-a-baking-queen and one good attempt (in that order.)

It takes practise, patience and persistence to get these right. Each time you make a mistake, you learn and you know better for the next time, so don't be disheartened. I mean, if you're an emotional lass like me, I actually got rather disappointed. BUT I WILL KEEP MAKING THEM UNTIL I CONSISTENTLY GET THEM TO BE AWESOME. *Breathes* Let's start with the recipe perhaps…

Oh, before we begin, I used the Italian meringue for this (that's what produced the awesome and good batches) as the French one's didn't work quite as well for me. Apparently they create more consistent results as you don't end up over-whipping the macaron mixture. The italian meringue involves heating sugar to a controlled temperature, whereas the French version doesn't. [Thank you BakerSt Cakes for this tip :) Do check out his lovely baked goods guys!]

As my macaron book (Macarons by Annie Rigg) uses only the French method I decided to google an Italian version. This lead me to annies-eats: How to Make Macarons Step by Step, (thank you annie-eats), which I then took and adapted.

Ingredients
215g almond powder
215g icing sugar 
82g and 90g egg whites, divided 
236g normal granulated sugar, plus a pinch 
158g water


Makes around 140 shells. Bear in mind not all batches will come out perfect if it's your first time!

Method:
  • In a food processor, process away the icing sugar and almond powder, to make sure they are combined and extra fine.
  • Sift this into a large mixing bowl and make a well in the centre (we don't want any lumps 'n' bumps folks!)
  • Pour in the 82g of egg whites and mix until it is pastey and thick. This may take some strength to do, or maybe I'm just weak, whatever..
  • Place the granulated sugar in a saucepan with the water on medium heat along with a sugar thermometer. When the temperature reaches around 200˚F - okay fine you can cheat and start a bit earlier like I did, I can get impatient sometimes - take another clean bowl and whip the other portion of egg whites, adding a pinch of sugar.

  • Continue with the egg whites until they reach soft peaks, whilst checking on the sugar. When the sugar reaches 248˚ F take it off the heat.

  • Pour this sugar syrup down the side of the bowl while whip-whip-whipping away on a higher speed until they are stiff and glossy! My mixture wasn't as stiff as it could have been, but they turned out fine so don't worry.
  • This is the time to get creative. If you want to colour your macarons. Do it NOW. For these I added red food colouring gel to achieve a dark pinky colour. I use a cocktail stick to do this. I also added freeze dried raspberry pieces/powder to give it a bit of flavour. 
  • Fold in the meringue with the almond paste, being careful not to over-mix.
  • Pop the mixture into a piping bag with a plain round nozzle and pipe small rounds on baking paper on a baking tray. To help you get perfect circles draw small rounds on the paper and flip the paper on the other side. Conversely, you could buy a silicon mat! If the mixture is too thick it will stay the size you've piped, too thin and it will spread too much. You want it in between.
Bang the mat/tray on the table to let out air bubbles.
  • Annie's version says you don't have to let them rest, but it is important that you do let them rest until a skin forms at the top and they are not wet to touch. This is to avoid cracks as the air will then escape from the bottom 'feet' of the macarons. Again another tip from BakerSt Cakes!
  • Now you're supposed to put them in a preheated oven and then turn it down to 160degrees C. I didn't do this as my macarons ended up cracking. Instead I switched on the fan oven to 150 and placed them in straightaway. They took longer to bake, 15-25 minutes, but it meant that they wouldn't crack and I wouldn't have to waste my efforts and end up sulking at a failed batch. I say you just keep experimenting with your oven. If you can put it higher then go for it, I'm not a fan of waiting around for too long to be honest.
  • Keep a close watch on them though, they are unpredictable fools.
  • And there ya go me lovlies. They should come out smoooth, shiny with risen feet. You can fill em up with whatever you like! I used white chocolate and dark chocolate ganache (separately): Simply melt 200g of choccy in a bowl over simmering heat, add 150ml double cream, 5 tbsps butter and whisk away! Then pipe them on a shell and leave to set.


The end product: Raspberry and Chocolate Macarons.

They're just one of the best things I have tasted and created! They should be crisp on the outside yet soft on the inside. Ideally, you should put them in the fridge for a day for the flavours to mature.


I then tried making these again but in more flavours. Mango with a mango crème filling. Peanut butter with a peanut butter and choccy filling and strawberry with chocolate ganache.

I'm going to have to admit, not all of these worked as well as I hoped. I had to keep them in the oven for agess and they ended up being more crisp than expected. Nonetheless, they were still devoured!


Boxed up for friends!


So have a go! They're dainty, yet fab. I'm still going to be perfecting my technique and trying out other recipes until I get them to be constantly immaculate. The next time you hear from me, I may complain that I have gone half bald..

I guess they really are 'bad boys.'

Au revoir mes amis.

Dainty Cook x


26 July, 2013

Get Loose: Chocolate and Honeycomb Mousse

A chocoholics paradise, this decadent mousse packed with rich honeycomb pieces will surely drive you and your taste buds wild!


Cooling, chocolate fixing, 'I want more' you will be gagging.

I love choccy mousse. I can't even tell you why. It's just so mmmmmmm *slowly sinks down on the sofa and licks lips* The smooth texture, the rich taste, the sweet fusion of the crunchy honeycomb. It's just overly seductive for the tongue. Can you get these in the supermarkets? No. 

Having to buy appetising products that are only 'suitable for vegetarians' is difficult. Chocolate mousse is a rare breed in this category, particularly one that screams a good consistency and explodes with flavour in your mouth as you eat it. The rest are just plain, limp and hardly chocolatey at all. 
So guys, have a try at this lucious little recipe. You won't regret it and it's a bitta fun!


Serves 6

Honeycomb Ingredients:
5 tbsps granulated sugar
2 tbsps golden syrup
1tsp bicarbonate of soda
Bit of sunflower oil to grease.

Method:

  • On some greasproof paper/baking sheet spread oil all over to grease and set aside on top of a chopping board.
  • Meanwhile, place the sugar and syrup in a saucepan and heat until the sugar has dissolved and the mixture turns a golden caramel colour.
  • Lastly, to make it foam up, quickly whisk in the bicarbonate of soda and pour it onto the paper, leaving it too cool for at least 10 mins.


Mousse Ingredients:
200g plain dark chocolate (or milk chocolate if you prefer a less sweeter/rich taste)
200ml double cream
4 eggs, separated

Method:
  • Heat the dark chocolate in a heatproof bowl over a pan of simmering water and leave to cool slightly.
  • Stir in the egg yolks.
  • In another bowl, with a hand held whisk, lightly whip the cream achieving soft peaks and fold into the chocolate mixture. Don't worry if it melts in, it's supposed to do that.

  • Whisk the egg whites in a large clean bowl, reaching stiff peaks. Fold this into the chocolate cream.
  • THE BEST BIT: grab your honeycomb slab and smash it into small chunks with a back end of a wooden spoon! (At this point, think about someone who you really hate or annoys you. TRUST me, it's very therapeutic!)
  • Fold the honeycomb into the mousse, leaving some for decoration (and some to nibble on in the meantime of course!) Fill 6 glasses or bowls with the mousse and leave it in the fridge for 10 mins or until set.

  • Sprinkle the leftover honeycomb on top just before you serve it. If you leave it too long in the heat it does tend to melt.


And voila! You have yourselves a sweet tooth's dream dessert!

[For those who love mousse, but prefer something less sweet, try milk chocolate or do without the honeycomb - although I think it gives it more bite and makes it less boring!]


What do lot you think of this recipe? 


The Dainty Cook x


25 July, 2013

Simply Strawberry Gelato (and a bit of Italy).

Simply Strawberry gelato.
When I think of gelato I instantaneously refer back to my lovely memories of Italy. Prior to my first visit in 2009, I heard a great deal about their gelatos by many who had been there. My dad would go every year for business and would always return praising their food, particularly their creamy confections.

Growing up with an absolute love for ice cream, this was music to my ears. I had to see what the fuss was all about. It was a must.

Daddy agreed to take the family and off we went, planning to visit various cities in Italia! Everyone was excited as we decided to head off to Venice, Rome, Florence and Pisa, thinking about all the things we were going to see and do. Yet there was a slightly younger me, who as thrilled as I was on the concept of an amazing holiday: could only ponder on whether my frozen friend would live up to my expectations over there. I mean you know, people exaggerate and have different tastes...and hey I love my ice cream!

Strolling along the Venetian streets, the gelato was one of the first things I ate. The initial verdict? Very tasty, but it lacked the 'wow factor' I believed I would experience.

We then went to another gelateria.

Yup. It was like I stepped right into heaven. Uber creamy, super flavoursome, extremely nom. My taste buds went frantic, a huge smile appeared on my face and my heart was content. Could it get any better than that?!

Throughout that trip we visited various gelaterias each day. We learnt that some places were good and others were OUTSTANDING. It was a matter of finding the right places, identified by the huge flavours some had. Just looking at the vast array of these was like staring at a colourful painting. Mesmerising.

Gelateria in Rome.


Anyway, enough about my trip. The reason why I thought I'd add that anecdote is because, sadly, English ice cream does not live up to that standard. This is why I make my own!

So what is the difference between 'gelato' and 'ice cream' or is it the same thing?! Well yes and no. While the word gelato is used by Italians for ice cream, there are diversities. Gelato has less fat, (so more milk than cream compared to ice creams) and less air, so it doesn't crystallise while frozen. I'll explain that better later, but for now, the recipe!

Ingredients:
300g hulled strawberries
2 tbsp icing sugar
1 tsp lemon juice
200ml whole milk
100ml double cream

Method:
  •  Remove the strawberry stems and chop them in half or quarters.

  • Place them in a blender or food processor adding the icing sugar and lemon juice and blend until it has turned into a red purée. I'd check the sweetness here, if it needs more icing sugar feel free to add some more as sweet as you'd like it.
  • Get your ice cream machine out* -- I own a Magimix Gelato Chef 2200. Amazing machine with a built in freezer so you can practically eat it straightaway! Churn the purée until think, being careful not to over churn it.


  • Slowly add in the milk while the machine is on and then add the cream and churn until a thick gelato consistency.
If you don't have a machine, don't worry you can still make ice-cream! Instead, freeze the purée until thick (not frozen) and mix in the milk. Then whip the cream, fold it into the purée mix and freeze to a gelato like consitency. To stop it from crystallising and turning icy, after every hour or so, keep folding or whipping the mixture to let out air and break the particles.

Another difference between the two is that Gelato is served at a slightly warmer temperature and isn't so watery as it melts. This is crucial. I froze mine for too long so ended up being like ice cream, but all you need to do is leave it out. I on the other hand, couldn't wait to eat it in this super hot weather! Also, I think next time I'd use a lot more strawberries to get more flavour and colour. Nonetheless, it was still delicious and refreshing :)

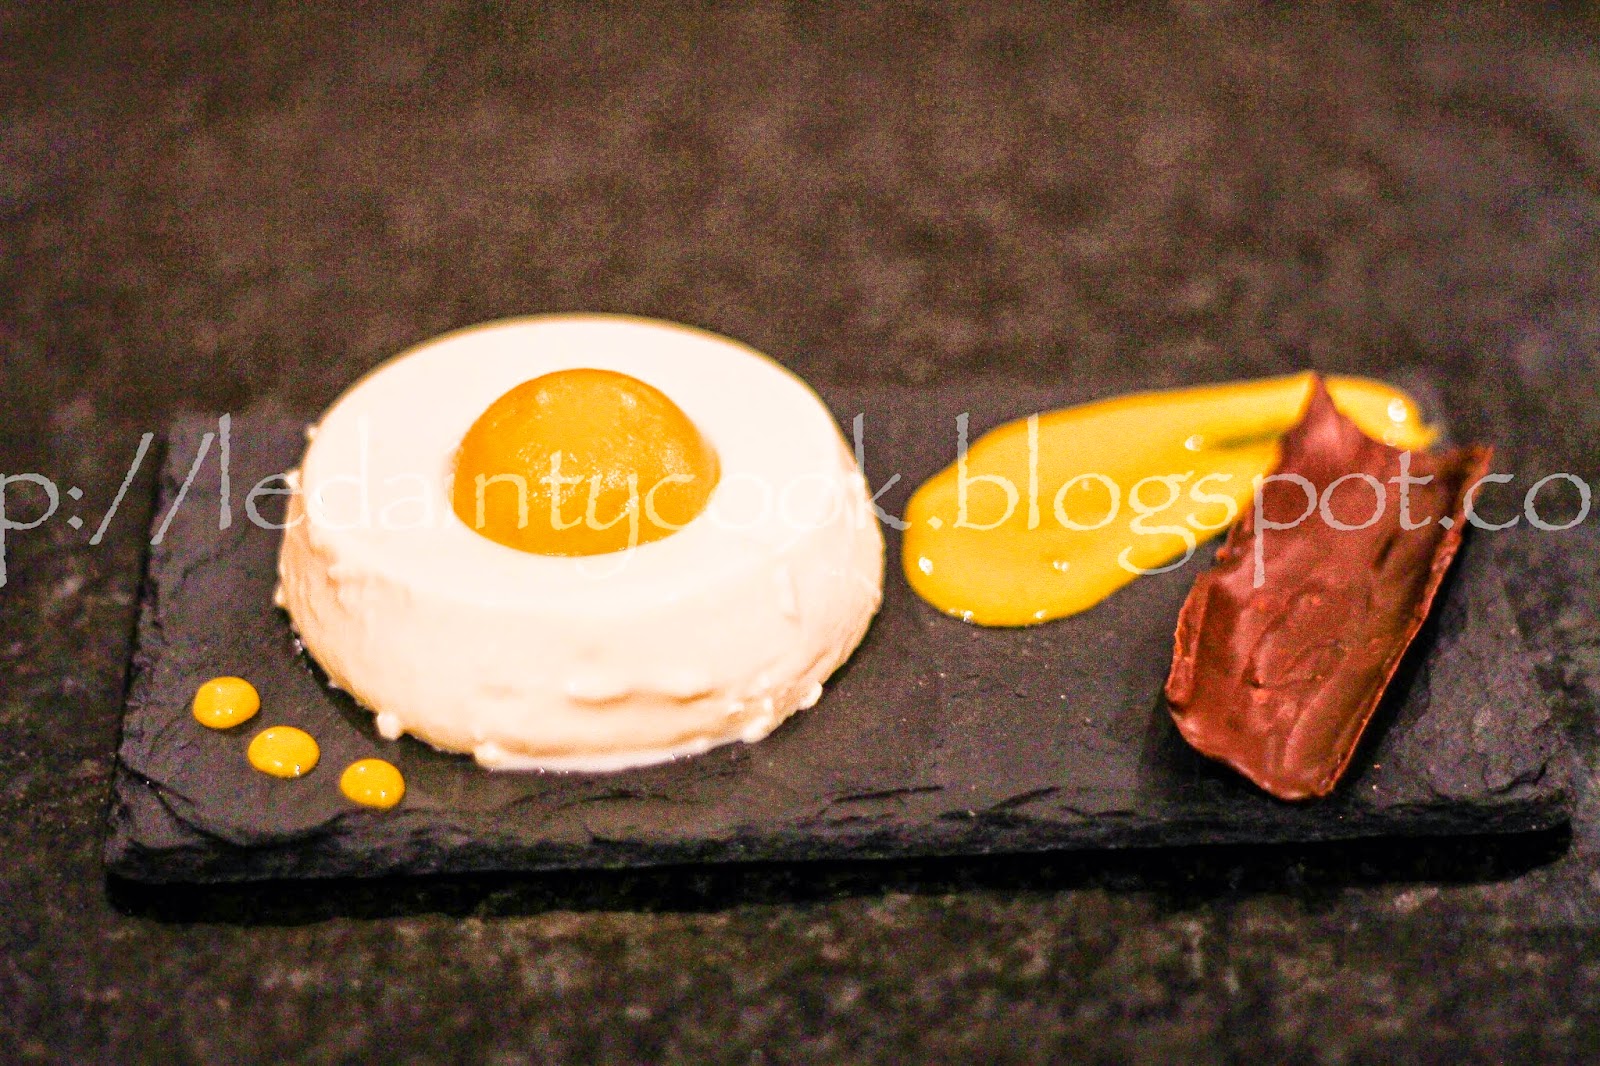
The finished product!


I put mine in wine glasses, added fresh strawberries and a chocolate piece (made from ganache) to give that 'showstopper' feel!

How can you not resist to make some in this current heatwave? 

I went back to Italy last year and I really could not get enough of this stuff. Who else agrees that they are a-may-zinggg?! Lemme know folks!

Ciao!

The Dainty Cook x